Where People & Piggies Thrive

Newbie or Guinea Guru? Popcorn in!

Register for free to enjoy the full benefits.
Find out more about the NEW, drastically improved site and forum!

Register

Cage RawhideKid Cage Construction - DELUXE! ? !

Oh! 3rd pic is outside door open! Excellent :)
 
When I raised rabbits as a kid, this is where the babies would be born - a little enclosed "square" off the edge of the main cage. For G Pigs, I'm planning on putting a plastic tray to the bottom of this, hoping that they use this area as their primary bathroom. That way we can easily pull the tray out, clean the bedding or fleece flipper, and put it back.

We'll see. Probably a pipe dream. Either way, it's a cool little hideout for them. Did you notice the cool archway my girls designed? I kinda like it, but it's hidden by the shelf above it. Oh well. Coming along.

Don't hurt as much as I thought I would today. Hoping to get a lot done, but it's been a long time since I've worked with plexiglass.

RHK
 
The archway is very cool! Good luck with your plexiglass. :)
 
Oh my god! I'm in love with this cage!!!!! I hope someday I can give my furry babies a cage like this one!!! :D Good job!!!!
 
It's coming along great, the archway is really neat. Great job on designing, girls!! :)
 
Tired today. Arms hurt. Went shopping at Joann's, home depot, and Uhaul store. Found only the "major uhaul stores" have the pads for sale. Got two for now. Found great coupon for Joann's so went there and got some fleece, hole punch/eyelette thingey, and some other stuff to make the fleece pads. Home depot - got some minor things for finer touches. Hope to do some today but arms hurt enough it may not get done. Started soaking some of the cut branches in vinegar/water today. May just go to Oktoberfest celebration and medicate my arms a bit tonight! Wife wants to go so that may be the plan. Headed out of town tomorrow so may have to wait until later in the week to get this done. Thanks all for the compliments. More to come.
 
Back from my trip. did 1.5 hours of work tonight to correct some issues. Still plenty to do..

Here is a better photo of the little door into their hidey-hole.

RawhideKid Cage Construction - DELUXE! ? !

Here is a shot of the interior left side. I enlarged the "top shelf" a bit as I realized it was too small for an adult Pig. I'll install plexi walls, and then a ramp going down to the middle shelf. That shelf will also have plexi, I think about 6 inches tall.
RawhideKid Cage Construction - DELUXE! ? !

Here is a shot from the left side/end. I plan to mount a fan with charcoal filter on the lower left box to pull air out of the box.

RawhideKid Cage Construction - DELUXE! ? !
Here is a shot of the "hay loft" as I think we'll call it. Just got the feedbox today. Not sure how I'll mount that on the outside left side, with feeder on inside of box. It is big!! And I need to research how high to mount it too. The front side will have plexi. Back side will have a mesh vent I think. Not sure yet.
RawhideKid Cage Construction - DELUXE! ? !
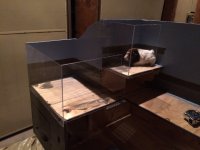
Here is a shot from the front. I'll mount a water on the outside, just to the right of the little box door. And then another water on the far right side of the cage. Plexi across the front and left side. 10 inches tall I think. the back right corner has a low wood edge because I'll put plexi on it to raise the edge higher. We have a window right there, so I though this would be a good place for them to look outside a little.
RawhideKid Cage Construction - DELUXE! ? !
Slow but sure, getting there.
I also swapped out the wheels on the bottom. I had used black ones, and they left marks on the cement outside - hate to have that happen on the inside of the house on our tile. So put Grey ones on.

RHK
 
Looks nice. Not sure if you know, they're not supposed to have unlimited pellets once they're older than 6 months old. You'll have to swap the feeder with bowls (preferably one for each pig).

Will they have enough ventilation once you put the fan in?
 
Dang! Really? Hadn't read that...although I'm happy to hear that. Hate the idea of mounting that big feeder on my cage. Thanks for telling me!

Should have plenty of ventilation. I'm putting some mesh type vents on back side too.
 
Okay... Do you know they need unlimited grass hay?
 
Love it. Thanks for sharing

Sent from my XT1254 using Tapatalk
 
Yup. Knew about the hay. Thanks! The top left part of the cage will be the hay "loft". We will put a food dish and water bottle in there as well.

Spent about an hour building and installing the "fan/charcoal filter" box on the left side. Also installed the water bottle bracket and hole for the water spicket. (1 of at least 2, maybe 3 that will be put in) It looks good. I'm not sure how high to install the water spicket. I'll have to research that. Here are a few photos of the fan box. We will paint it all soon. After that I'll put the fan and filter in. Filter side towards interior, and fan pulling air out of the cage/box.


RawhideKid Cage Construction - DELUXE! ? !
The fan box has a very small lid on the top. Doesn't work well now - i'll have to add a rubber flap to it. That's so I can replace the charcoal filter occasionally.
RawhideKid Cage Construction - DELUXE! ? !
Here is the charcoal filter and USB fan i'll put in. It's has 3 levels and is very quiet. Doesn't pull a ton of air but I think that's ok.
RawhideKid Cage Construction - DELUXE! ? !
 
Got 2nd coat of paint on the cage last night. Today added some blue paint on the top of the inside of the wood to represent sky. Added some vent grates on the back side which was pretty easy because they're made out of tin and to be cut easily with tinsnips.
RawhideKid Cage Construction - DELUXE! ? !
Below you can see the vents as well as the small ope strips with plexiglass over one. We will mount a lightbar strip over the top of the plexiglass shining inward.
RawhideKid Cage Construction - DELUXE! ? !

Went to cut some plexiglass and was struggling with it as it was splitting where we wanted a straight line. Didn't have the correct tool to hold the metal straight edge and the box cutter slipped. I think I'll go to Home Depot and see if I can find a better straight edge as well as a scroll saw blade for plexiglass.

RawhideKid Cage Construction - DELUXE! ? !

Could've been a lot worse. Just got the very tip of my finger to make it bleed and hurt a little bit. Still hope to finish up the Plexiglas today and hopefully start on the coroplast. Found a specific drill bit to drill holes in the coroplast and it is working very well.

All for now. RHK
 
FYI, I cut plexiglass with a jigsaw.
 
Do you use a special blade or technique?
 
Nope, just a fine-toothed blade.
 
Well, not sure what Im Doing wrong with the jigsaw. I got a blade specific to plexi, tried multiple different speeds and settings. I kept breaking the plexi. It might be because I bought very thin plexi. Not sure. Just too much vibration.

But i did find a solution. My Drexel with a cutting disk. It melts a nice line with a steady hand! I can even do curves and designs if needed. I sand the edge after, peel off the covers, and I'm good to go. Slow though.

I made a mistake that I'll correct tomorrow though. S'mores seems to like the high level.

RawhideKid Cage Construction - DELUXE! ? !

I had planned only 4 inch wide ramps but in researching tonight, seems like 5-5.25 inch wide is more normal. And I need to buy some "binder edges" to cover the raw plexi edges. I have a nice piece of "angle wood" to cover the 90 degree plexi turns. Thought I might just glue them but gluing plexi is not easy.

Getting there. Hope to get a lot done tomorrow but we will see. My finger still hurts dang it.

RHK
 
Coming along, slow but sure. These projects always take a lot longer than I expect, but it's ok. Sure fun doing it.

I figured out that it was better to put in the coroplast before all the plexi went up, so i stopped the plexi work and started the coroplast. Made a big mistake not doing the largest piece of coroplast base first, so I'll have to go buy another piece, or do the main bottom in two pieces, which would be ok.

I also enlarged the top level and put a support board between top and middle level. My wife felt the top level, which was only 8x6 inches, was too small for them to do much, so I expanded it quite a bit.

Working with coroplast is pretty easy once you get the hang of it! I bought some double sided tape to tape it to the walls. My girls cut the "cloud edges" at the top.

Looked everywhere for "stair tread" to put on the ramps, and couldn't find any. Homedepot, office max, target, michael's - nothing. I've decided to use "shelf liner - vinyl top" as I can remove and wash or replace it if needed. I'm going to try to build my ramps out of plexi - heat it and bend it into a "LI" or "U" shape with flat bottom. We'll see. I've never tried to bend plexi before. Got a heat gun at Homedepot.

RawhideKid Cage Construction - DELUXE! ? !

RawhideKid Cage Construction - DELUXE! ? !


RawhideKid Cage Construction - DELUXE! ? !
 

Attachments

IMG_3581.jpg
Piggies are in the cage! Not done, but i'm headed out of town for a week, so had to finish up as much as I could to get them in before I left. Still some finishing touches for sure, including a much needed "hay rack", but for now, it's done. Lots of things I'd do differently of course.

I haven't added up the cost, but so far it's been 33 hours of work for myself, and maybe 10 more from my kids. Tired. Glad it's gotten to this point but wish it was completely done. Hope in another couple of weeks it'll be "fully finished" and pizzaz for photos. S'mores and Pumpkin are slowly exploring.

Let me know if you experts see any concerns here. Did what I could but happy to have feedback on if you were to have done it differently somehow. Who knows, perhaps I'll make another version to replace this one!!!

Here are some shots:

RawhideKid Cage Construction - DELUXE! ? !

RawhideKid Cage Construction - DELUXE! ? !

RawhideKid Cage Construction - DELUXE! ? !

RawhideKid Cage Construction - DELUXE! ? !

Enjoy!!! Happy days.

RHK
 
Oh, and the fleece is not finished. I just cut some uhaul to fit under the fleece strips. Nothing fancy, but for now, hopefully works. Also, installed 3 temp gauges to watch the temp in 3 places in the cage! And lastly, two fans that are USB based. I also put in some low light LEDs but they stopped working after I got them installed, so I'll have to fix them later.
 
Status
This thread has been closed due to inactivity. You can create a new thread to discuss this topic.

Similar threads

flowerpaw
Replies
6
Views
172
ItsaZoo
ItsaZoo
A
Replies
5
Views
583
iggy
failur3byh3art
Replies
1
Views
355
Guinea Pig Papa
Guinea Pig Papa
KirbyFan8910
Replies
3
Views
761
ItsaZoo
ItsaZoo
fairypig
Replies
2
Views
204
ItsaZoo
ItsaZoo
Top