I've made a hobby of building wooden hay racks, hidey houses and toys for my guinea pigs. Here's an easy guide to how I made a hay rack. You can easily change the measurements or modify it to fit your needs.
Tools: Skill saw, power drill with drilling bits (1/8" or 5/32") and screw bits, power sander, C-clamp, pruners (or other heavy duty scissors)
Material:
1) 1x4 of pine or other soft wood (at least ~22")
2) Small section of plywood (at least 6" x 10")
3) 1x1 of soft wood (at least 10")
4) 1 small dowel (I think I used 3/16" dia., you'll need at least 25 inches)
5) Screws (i use self-tapping for ease of use)
6) 2 small threaded hooks
Instructions:

1) Clamp the 1x4 to a stable work surface. Using the saw, cut two sections of equal length 6" for the sides and another section 10" for the bottom from the 1x4
2) Clamp the 1x1 and cut a 10" section of the 1x1 for the top beam
3) Using the scissors and muscle, cut 4 sections of the dowel. Each of these sections should be slightly less than 6" (I usually go for ~5.5"). It is not crucial for these to be the same length.* I have several extra dowels since I was making two at once

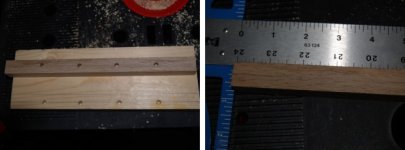
4) Using a ruler, semi carefully measure a line down the middle of the 1x1 top bar. At 2" intervals along this bar mark 4 "x"s. They should be at 2,4,6, and 8 inches along the 10" section.
5) Using a bit that is slightly smaller than your dowel's diameter, drill holes on the X's that DO NOT go all the way through the wood.
6) Repeat steps 4) and 5) on the bottom section measuring the X's just .5" in from the edge and again spaced by 2". perfect alignment of these holes is not critical either, but they should be fairly well aligned.
5) Sand everything down!! Use either a power sander or your good ole' sand paper

5) Time to assemble! Using your power drill fixed with a screw driver bit and self-tapping screws, Attach the sides to the bottom using two screws on each side.
6) Using strong arms again, twist each of the dowels into the four holes on the top beam. You'll need to twist and push to get them to fit in. If they are not going in, widen the holes. Once all the dowels fit nicely remove them and notice how the wood has been compressed, do the same with the other end of the dowel (still inserting it into the top bar). This time, don't remove it! Flip it upside down and carefully insert the dowels into the holes on the bottom board. The dowels will be able to bend a little if your holes aren't perfectly aligned, but be careful not to break them.
7) Use one screw on each side to hold the top beam in place.
8) Almost done. Just cut out a rectangular portion of plywood with your saw (~ 6" x 11.5"). It works best to measure it to fit your assembled rack instead of cutting it out earlier. Attach with four screws.
9) Screw in two hooks. This too can be done easily by hand if you're lazy like me and don't like using drill bits.
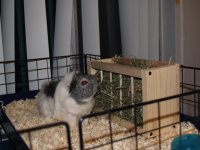
10) Guinea test:
Piggy Approved!!
Tools: Skill saw, power drill with drilling bits (1/8" or 5/32") and screw bits, power sander, C-clamp, pruners (or other heavy duty scissors)
Material:
1) 1x4 of pine or other soft wood (at least ~22")
2) Small section of plywood (at least 6" x 10")
3) 1x1 of soft wood (at least 10")
4) 1 small dowel (I think I used 3/16" dia., you'll need at least 25 inches)
5) Screws (i use self-tapping for ease of use)
6) 2 small threaded hooks
Instructions:

1) Clamp the 1x4 to a stable work surface. Using the saw, cut two sections of equal length 6" for the sides and another section 10" for the bottom from the 1x4
2) Clamp the 1x1 and cut a 10" section of the 1x1 for the top beam
3) Using the scissors and muscle, cut 4 sections of the dowel. Each of these sections should be slightly less than 6" (I usually go for ~5.5"). It is not crucial for these to be the same length.* I have several extra dowels since I was making two at once

4) Using a ruler, semi carefully measure a line down the middle of the 1x1 top bar. At 2" intervals along this bar mark 4 "x"s. They should be at 2,4,6, and 8 inches along the 10" section.
5) Using a bit that is slightly smaller than your dowel's diameter, drill holes on the X's that DO NOT go all the way through the wood.
6) Repeat steps 4) and 5) on the bottom section measuring the X's just .5" in from the edge and again spaced by 2". perfect alignment of these holes is not critical either, but they should be fairly well aligned.
5) Sand everything down!! Use either a power sander or your good ole' sand paper

5) Time to assemble! Using your power drill fixed with a screw driver bit and self-tapping screws, Attach the sides to the bottom using two screws on each side.
6) Using strong arms again, twist each of the dowels into the four holes on the top beam. You'll need to twist and push to get them to fit in. If they are not going in, widen the holes. Once all the dowels fit nicely remove them and notice how the wood has been compressed, do the same with the other end of the dowel (still inserting it into the top bar). This time, don't remove it! Flip it upside down and carefully insert the dowels into the holes on the bottom board. The dowels will be able to bend a little if your holes aren't perfectly aligned, but be careful not to break them.
7) Use one screw on each side to hold the top beam in place.
8) Almost done. Just cut out a rectangular portion of plywood with your saw (~ 6" x 11.5"). It works best to measure it to fit your assembled rack instead of cutting it out earlier. Attach with four screws.
9) Screw in two hooks. This too can be done easily by hand if you're lazy like me and don't like using drill bits.
10) Guinea test:

Piggy Approved!!
