CathiiPiggie
Well-known Member
Cavy Slave
- Joined
- Feb 17, 2012
- Posts
- 600
- Joined
- Feb 17, 2012
- Messages
- 600
A number of people have been asking me how I make my cozy sack I posted on a thread a while ago, so I decided to post a tutorial!
Note:
In order to make this set of instructions the best it can be I've tried and tested other methods across the internet and combined some of my own ideas. It's not completely original or my idea, but this method is my own.
I took the photos from my own website, so they have the watermark over it. Don't worry, I'm not stealing anybody's work!
You Will Need:

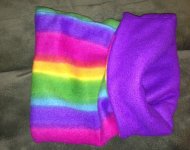
-Large patterned fleece blanket
-Large plain fleece blanket
-Half a metre of 4oz or 6oz wadding/batting (optional)
-Needle and embroidery thread (colours matching outside fleece)
-Scissors
-Pins
-Sewing Machine (optional)
-Wire (optional)
Method:
1. Lay out your fleece and work out ideal measurements. For young guinea pigs, the cozy can be smaller but it is worth making one big enough for a fully grown cavy if you'll want to use that cozy when gets older. Make it big enough for the cavy to turn around in, with an extra inch for sewing space and an extra few inches length ways to roll back. If you are making for a pair, double the width measurements below.
My measurements:
-18" long
-26" wide (to be folded over to make 13" wide)

2. Cut the fleeces to size. Make sure the inside fleece is the same size as the outside fleece, even if using wadding.
3. Lay the wadding/batting material over the outside fleece, leaving an inch gap around the sides. Cut it to size.
4. Place the pins to keep it in place in the wadding and through the outside fleece, leaving an inch gap around the sides.

5. If you have a sewing machine, get it threaded up. If not, thread the needle. Start sewing around the wadding and through the outside fleece, leaving a small gap from the side of the wadding (see photo below) to where you are sewing to make sure it stays securely sewn in place. I suggest you use running stitch or back stitch.

6. Once you've sewn all the way round, it should look like this:

7. Fold the outside fleece in half, so the width is 13". Leave about 1/4 of an inch over the fold for sewing purposes.
Fold the inside fleece in half the same way, but have a 3/4 of an inch fold if you're using wadding so there is enough space. If not using wadding, just leave 1/4 or 1/2 an inch fold.

8. Pin (with pins) or tack (with thread) down the fold ready for sewing to keep in place. Make sure the wadding is on the outside of the tube so you can see it.

9. Sew down the fold of the inside and outside fleeces separately. If you have a large fold gap, then sew down both sides of the fold so there's not a loose flap.

10. Slip the inside fleece through the outside fleece. The wadding should still be on the outside.

11. Pin or tack the end of the 2 'tubes' together, but only pin through 2 layers of fleece, not 4. Remember to line up the inside and outside folds together for a neat finish.

Note:
In order to make this set of instructions the best it can be I've tried and tested other methods across the internet and combined some of my own ideas. It's not completely original or my idea, but this method is my own.
I took the photos from my own website, so they have the watermark over it. Don't worry, I'm not stealing anybody's work!
You Will Need:
-Large patterned fleece blanket
-Large plain fleece blanket
-Half a metre of 4oz or 6oz wadding/batting (optional)
-Needle and embroidery thread (colours matching outside fleece)
-Scissors
-Pins
-Sewing Machine (optional)
-Wire (optional)
Method:
1. Lay out your fleece and work out ideal measurements. For young guinea pigs, the cozy can be smaller but it is worth making one big enough for a fully grown cavy if you'll want to use that cozy when gets older. Make it big enough for the cavy to turn around in, with an extra inch for sewing space and an extra few inches length ways to roll back. If you are making for a pair, double the width measurements below.
My measurements:
-18" long
-26" wide (to be folded over to make 13" wide)
2. Cut the fleeces to size. Make sure the inside fleece is the same size as the outside fleece, even if using wadding.
3. Lay the wadding/batting material over the outside fleece, leaving an inch gap around the sides. Cut it to size.
4. Place the pins to keep it in place in the wadding and through the outside fleece, leaving an inch gap around the sides.
5. If you have a sewing machine, get it threaded up. If not, thread the needle. Start sewing around the wadding and through the outside fleece, leaving a small gap from the side of the wadding (see photo below) to where you are sewing to make sure it stays securely sewn in place. I suggest you use running stitch or back stitch.
6. Once you've sewn all the way round, it should look like this:
7. Fold the outside fleece in half, so the width is 13". Leave about 1/4 of an inch over the fold for sewing purposes.
Fold the inside fleece in half the same way, but have a 3/4 of an inch fold if you're using wadding so there is enough space. If not using wadding, just leave 1/4 or 1/2 an inch fold.
8. Pin (with pins) or tack (with thread) down the fold ready for sewing to keep in place. Make sure the wadding is on the outside of the tube so you can see it.
9. Sew down the fold of the inside and outside fleeces separately. If you have a large fold gap, then sew down both sides of the fold so there's not a loose flap.
10. Slip the inside fleece through the outside fleece. The wadding should still be on the outside.
11. Pin or tack the end of the 2 'tubes' together, but only pin through 2 layers of fleece, not 4. Remember to line up the inside and outside folds together for a neat finish.


")